File Management -- Common Tasks
Selecting Multiple Files (or Folders)
Zipping (Compressing) a Folder
In the previous lesson we learned the basics of Windows Explorer, the File Management Utility in Windows. We will now take a closer look at what you can do with your files once you find them!
Switching Between Views - So far, we have only looked at one of the Windows Explorer views that are available for looking at your files and folders. Windows Explorer allows for several additional methods of viewing. Some of the views increase the size of the icons in the display window (which is especially handy when viewing files that are images or photos) and other views give additional information about the file (example: the Details view). Below, we will look at the method for switching between views.
How to switch between views in Windows Explorer:
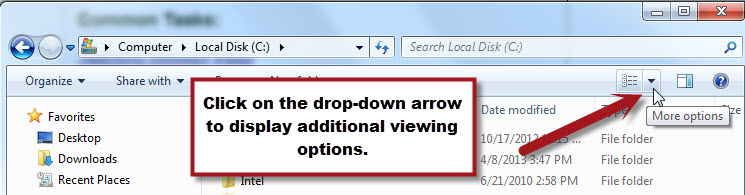
To change the view of the Windows Explorer position your mouse on the drop-down arrow in the upper right corner of the Windows Explorer window. A pop-up message displaying "More options" should display. Click the drop-down arrow to display the additional options available to you.
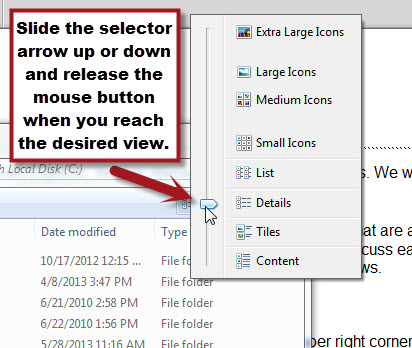
This will bring up a listing of the views available. To select a view, click on it in the list. If you would like to preview what the view will look like, slide the selector arrow up or down to a view and see the view change in the Windows Explorer window. You can then select a view by releasing the mouse button when the desired option is reached.
Finding Your Files - We have already taken a look at how to locate files if you know where they are. You could do this by clicking on the drive the file is stored in and drill your way down through the folder structure until you see the desired file in the right pane of the utility. This is what we did when we found the paper 1.docx file.
But, suppose you don't remember where you saved your file? How would you go about finding it? You could randomly click on folders and sub-folders until you found what you were looking for, but there is a much easier way to search.
In the upper right area of the Windows Explorer window, there is a "Search" box in which you can type a key word. The utility will search through the area you are currently viewing. You can choose to search the entire drive (as we have done in our example) or within a folder or group of sub-folders. After typing the keyword, simply press the enter key on the keyboard and the right-pane of the utility window will filter to return items that contain the keyword in either the filename, content or properties.
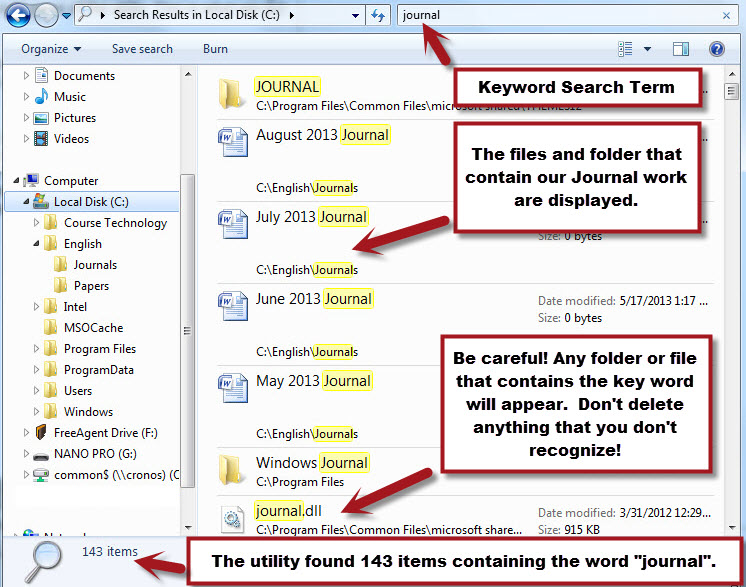
In our example, we typed the keyword "journal" into the Search box and the utility filtered the right pane to show only those folders and files that contain the word "journal". You will see from the search results that not only was our Journal folder returned, the individual Journal Word documents were displayed. Additionally, there were other files on the C:\ that happened to contain the word "Journal" that don't have anything to do with our classwork.
It may be tempting to delete or move files that you don't recognize, but it is important that you don't do that. The files could be necessary to keep your computer functioning properly. Our screenshot provides one example of one of these types of files. The last file to be returned is named "journal.dll". This is a file that Microsoft needs to keep its programs running properly.
Opening a File - Windows Explorer can be used to open a file that is saved on your computer or other storage media. In order for a file to open, however, an application that can read the file must be installed on the computer. For example, if you have a file that is in Microsoft Word format (with a .docx file extension) the computer that you are attempting to open the file with must have either Microsoft Word or another program that can read Word files installed on it.
You can typically tell if your computer has a program that is able to open a file by the way the icon looks in Windows Explorer. If Windows Explorer determines that the computer has a program that can open a particular file, the icon used to represent the file will show the program that will be used. If Windows Explorer cannot find a program with which to open a particular file, the icon is shown as a blank page. Additionally, it will also display the file extension of the file.
If you determine that your computer has the software necessary to open a file, you simply need to double-click on it. Doing so will first start-up (launch) the program that is needed and then open the file within that program.
If your computer does not have the software necessary to open a file, you will be prompted to search for compatible software. Doing so would typically require you to download or purchase the necessary program and install it on your computer.
The exam
ple demonstrates three files, two of which have associated programs installed on the computer.
We can tell from the screenshot that the "Assignment2" file is a Microsoft Word document, the "Data and Charts for Assignment 2" file is an Excel spreadsheet and the "Project Plan.mpp" file is not associated with any program that is installed on the computer. In this case, the file is a Microsoft Project file (you wouldn't necessarily know this and in order to be able to work with the file, a program called Microsoft Project would need to be installed on the computer.
To open a file, for example, the "Data and Charts for Assignment 2" spreadsheet you would double click on the icon. This will first launch Microsoft Excel and then open the spreadsheet.
Copying a File (or Folder)- It is often necessary to make a copy of a file or folder for backup purposes, sharing or portability. This task can easily be accomplished using Windows Explorer. The process of copying will leave the original file (or folder) intact, in its current location and create a duplicate in a new location. The duplicate is created when the copy is pasted resulting in two files (or folders) that typically exist in different locations. Below are the steps you would use to copy and paste in Windows Explorer. In the example, we will be copying our "June 2013 Journal" file from the hard drive of the computer (C:\ drive) and pasting it on a removable flash drive (f:\ drive).
To copy a file: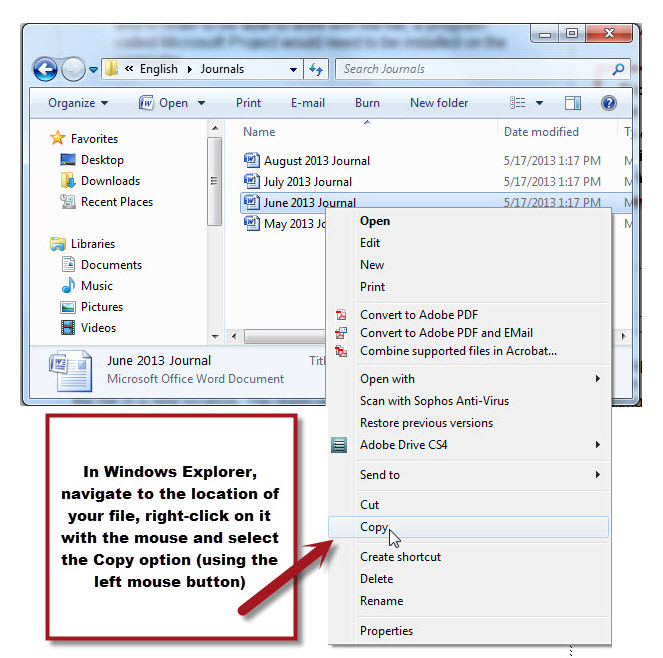
Within Windows Explorer, you first need to navigate to the location at which the file is saved. In our example, this is the Journal sub-folder of the English folder on the C:\ drive.
Once you are in the correct location point to the file with the mouse and right-click. (We learned about Right-Clicking in the Computer Operations Module of this Tutorial)
A shortcut menu will appear. Using the left mouse button, click on the option to "Copy".
This will make a copy of the file and save it to what is know as the clipboard. The clipboard is a temporary holding area the computer uses for any item that has been copied or cut.
Once the file (or folder) is copied to the clipboard, it can now be pasted. To paste the copy (and create the duplicate of the file) you must use Windows Explorer to navigate to the location where you wish to save the copy -- in this case it is the Flash drive. If there is a specific folder that you would like to use, you must double click the folder to open in. In our example, we will be pasting the copy in the Homework folder on our Flash Drive (Drive F:\).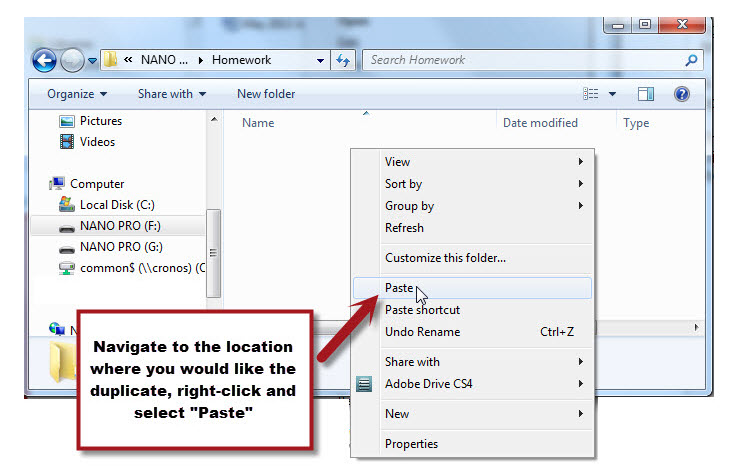
Once you are in the desired location, click the right mouse button again to bring up the short-cut menu and select the "Paste" option (using the left mouse button). (screenshot to the left)
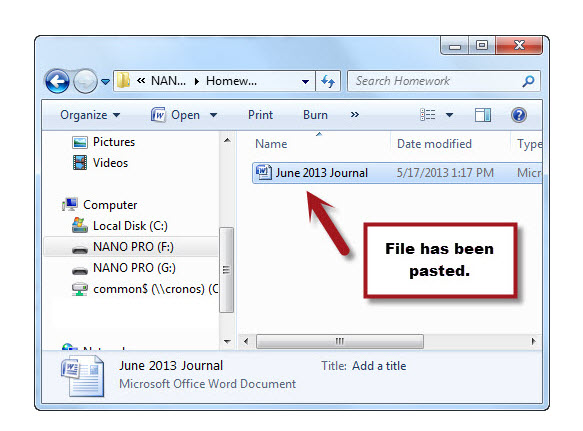
You should now see the duplicate file (or folder) in the new location. (screenshot below).
Moving a File or Folder- The process to move a file (or folder) is very similar to that of c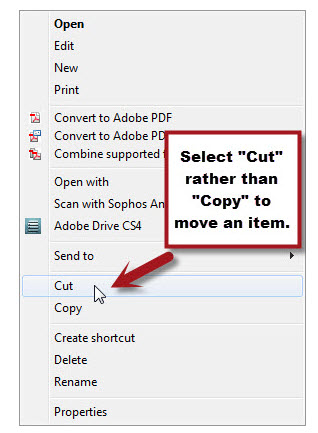 opying. Rather than keeping the original intact and in it's current location, however, the file (or folder) is removed from the original location, placed on the clipboard and then pasted (moved) to the new location. This results in only one file (or folder) -- not duplicates as in the copy process.
The only difference between copy and move is the option that is chosen from the shortcut menu after you right-click. Rather than choosing "Copy", you will be choosing "Cut".
The process for pasting would be the same as that for copying.
Deleting a File (or Folder) - The shortcut menu that we have been using for copying and moving also allows for the deletion of items as well. BE VERY CAREFUL when deleting items from a folder or drive. If a mistake is made and an item is deleted accidentally it is often gone permanently. The exception to this is if the item existed on the hard drive of the computer (the c:\ drive). Windows offers a utility (known as the recycle bin) that will give you a second chance if an item is deleted in error. The Recycle Bin typically resides on the Windows Desktop. To retrieve an accidentally deleted file, double-click on the recycle bin. If your file is there, you can right-click on it and select "Restore". Doing so will put the file back in its original location on the C:\ drive.
It is important to note, that the recycle bin only gives a second chance to items that are deleted off of the hard drive (C:\). Files that are saved on an external flash drive, external hard drive or network drive are deleted PERMENANTLY when delete is selected. There is no recycle bin for these external storage areas.
Selecting Multiple Files (or Folders) - It is possible in Windows Explorer to select multiple files or folders. You may want to do this to efficiently move or copy many items at once rather than one at a time. You can also select multiple items for deletion.
Selecting multiple items involves using a combination of the keyboard and mouse. There are two options for selecting multiple items. You can either select items that are adjacent to each other in the listing in Windows Explorer (which uses the Shift key on the keyboard) or you can select non-adjacent items from the listing in Windows Explorer (using the Ctrl key). The process for each is below:
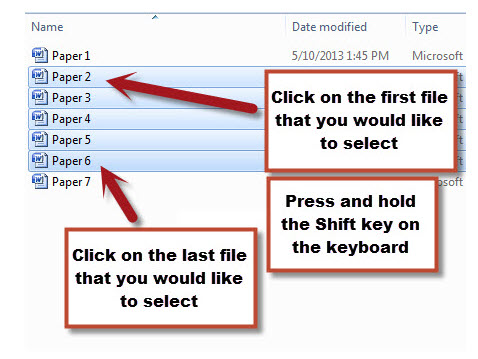
Selecting Items that are adjacent to one another in Windows Explorer:
- Navigate to the folder that contains the items that you would like to select.
- With the mouse, click on the first item you would like to select.
- Press and hold down the "Shift" key on the keyboard.
- With the mouse, click on the last item in the list that you would like to select while keeping the "Shift" key pressed down.
- Release the "Shift" Key.
- All items between the first and last item should now be selected.
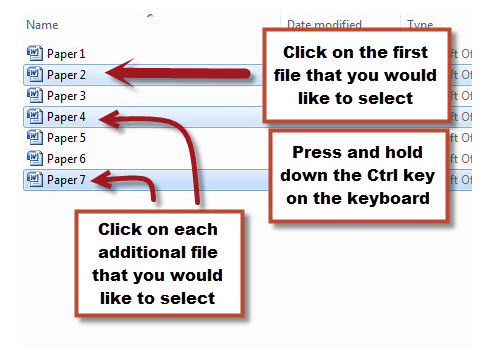
Selecting Items that are not adjacent to one another in Windows Explorer:
- Navigate to the folder that contains the items that you would like to select.
- With the mouse, click on the first item you would like to select.
- Press and hold down the "Ctrl" key on the keyboard.
- With the mouse, click on each additional item that you would like to select while
keeping the "Ctrl" key pressed down - Release the "Ctrl" Key.
- All items that were clicked on should now be selected.
Zipping (Compressing) a Folder - We have learned that zipping is the process of packaging a folder that contains multiple files into a single file (called a "Compressed" or "Zipped" file). In addition to combining multiple files into one, the resulting zipped file typically takes up less storage space. Know![]() ing how to zip files is especially useful when you need to send multiple files to someone (example: through email or an Online course). A Zip file has a ".zip" file extension and the icon for the zip file typically looks like a folder with a zipper. In order for the recipient to view the files, they would first need to unzip (or Extract) the zipped folder to be able to access the individual items inside.
ing how to zip files is especially useful when you need to send multiple files to someone (example: through email or an Online course). A Zip file has a ".zip" file extension and the icon for the zip file typically looks like a folder with a zipper. In order for the recipient to view the files, they would first need to unzip (or Extract) the zipped folder to be able to access the individual items inside.
Windows Explorer allows for the Zipping and Extraction of files. Below is an example of how to zip a folder. In our example, we will be zipping the "Papers" folder that we have been working with throughout this tutorial. Remember, the "Papers" folder is a sub-folder of our "English" folder on the C:\ drive and it contains multiple files. Once the folder is zipped, we can send it via email as a single attachment rather than needing to attach each file individually.
Steps for Zipping a folder using Windows Explorer:
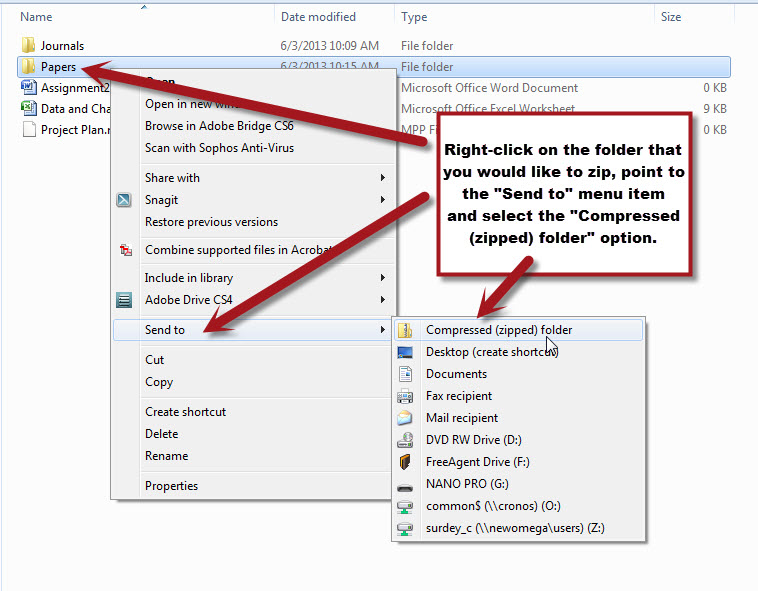
- Navigate to the location of the folder that you would like to zip. Do not open the folder, just click on it once to highlight it.
- Right-click on the folder, point to the "Send-To" option and select the "Compressed (zipped) Folder" option.
- If a border appears around the folder name, Press the Enter Key to accept the default name of the zipped folder.
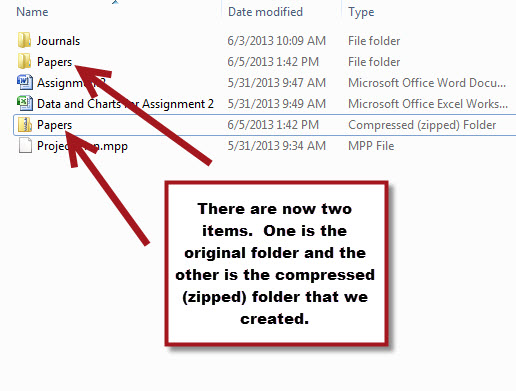
- This will create a second copy of the folder with a ".zip" file extension. The icon of the zipped folders also slightly different than the original as it contains a picture of a zipper on the folder.
- The zipped folder is now ready to be sent. (Please see the "Communicating Using a Computer" area of this tutorial for more information about attaching files.
 Steps for Extracting (Unzipping) a file using Windows Explorer:
- Navigate to the location that contains the zip file. Do not open the folder, just click on it once to highlight it.
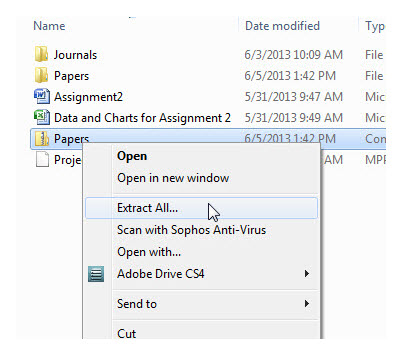
- Right-click on the zip file and select the "Extract All" option from the shortcut menu.
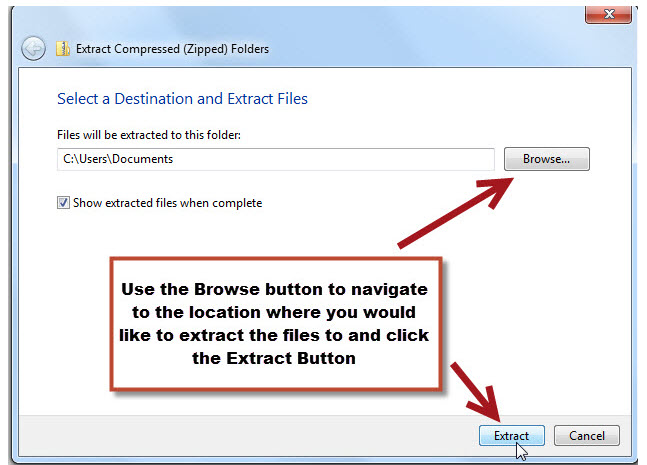
- A screen will appear asking where you would like to extract the files to. Use the Browse button and Navigate to the location you would like. (In our example, the files will be extracted to the "Documents" folder.) Click Extract when the correct folder is selected.
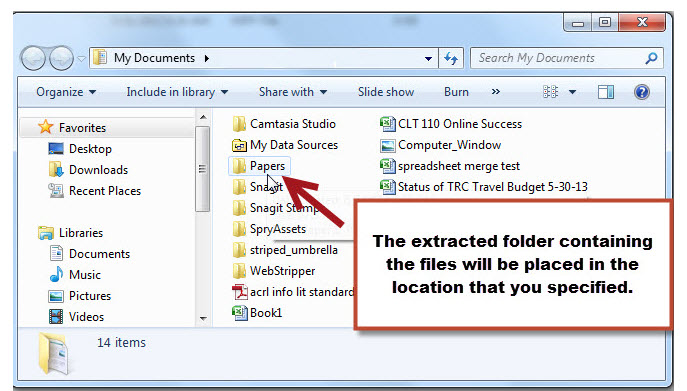
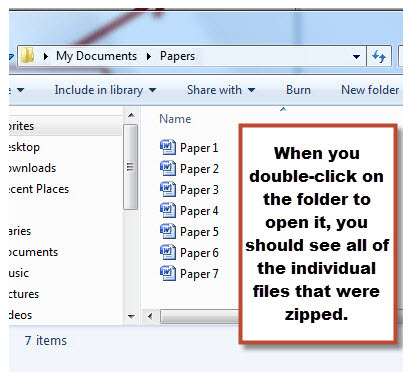
- The files will now be extracted to that location and you should see a folder (which should be named the same as the original folder) in the location that you specified. If you double-click on the new folder, you should see all of the individual files.