Using a File Management Utility to Organize Your Files
What is a File Management Utility?
A File Management Utility is a computer program that provides a user with a graphical interface in which he/she can organize files and folders on a computer's storage device. This lesson will focus on the built in File Management Utility that is packaged with Microsoft Windows ("My Computer", "Computer" or "Windows Explorer" depending on the version of Windows you are using). As we stated in the last lesson, we will be referrin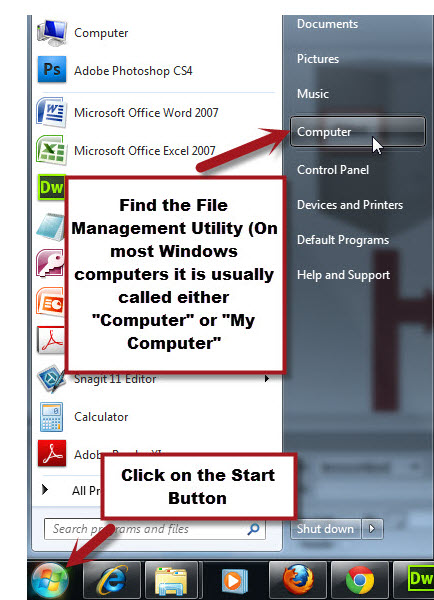 g to the utility as "Windows Explorer" for consistency. Please note that "Windows Explorer" is a file management utility and should not be confused with "Internet Explorer" which is a web browser.
Windows Explorer can usually be found by clicking on the Windows Start Button. On most computers it will be displayed in the column of Windows programs on the right side of the menu that pops up.
The screenshot to the right demonstrates how you could access Windows Explorer by clicking on the "Computer" option in the menu
What Will the Utility Tell Me?
When you click on "Computer" in the file menu, the Windows Explorer will open. We learned earlier in the lesson the differences between a drive, folder and file. The main window below will display all of the drives that your computer has access to and will also give you an area in which you can navigate with the drive through your folder structure to locate files. Once a folder or file is located, it can be moved, copied, renamed, zipped or deleted. Our next document will cover each of these processes.
The computer depicted In the screenshot below has access to several drives (also called "disk drives") on which information can be stored. There are three types of disk drives represented in the picture: Hard Disks, Removable Storage and Network Locations. We will go into additional detail regarding the typical storage locations available to you at Broome Community College, but for now we will just quickly look at what is meant by each type of drive.

Hard Disk Drive: This type of drive typically can not easily be removed from the computer and transported from place to place. A common letter designator for the main hard disk drive of a computer is C:\. The C:\ drive is typically the computer's main internal storage unit. It is also possible to add additional hard disks to your computer, such as an external hard drive which is typically used for backup. At BCC, if you are working in a computer lab, you want to make sure that you don't save your work to the C:\ drive as it will only exist locally on the individual computer in the lab.
Removable Storage: There are several different types of removable storage that can be used for saving and transporting files from one computer to another. For our purposes, we will focus on the Flash Drive (also known as the "Thumb Drive"). The Flash Drive is a small device with storage capabilities that vary depending on the device and is accessed by the computer through a USB port.
Network Locations: If your computer is connected to a computer network (as the PCs at BCC are) you will most likely have access to network drives in addition to those available locally on the computer that you are using. The computer that contains the network drive will be physically located in another location on a special computer known as a server. The benefit of using the network drive on campus is that it can be accessed from any computer on campus that allows you to log on to the network. At BCC, your network drive is the Z:\ drive.
How Do I Use Windows Explorer (the File Management Utility) to See My Folders and Files?
The image above focused on the main window that appears when opening the Windows Explorer File Management Utility. We will now look at how folder and file structure is displayed in the program and how you can open drives and folders to see the files contained within them. We will focus on the C:\ drive for demonstration purposes. Please note that the principles and skills that we learn for the C:\ drive can be applied to other drives on your computer such as a flash drive or your network Z:\ drive.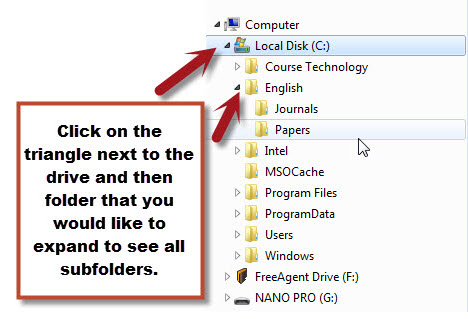
First, we will look at how to expand the folder listing on the left side of the Explorer window. By default, all drives are collapsed when the window first opens. To see the items saved to a particular drive, you hover your mouse over the drive letter until a triangle appears. If you click the triangle, the drive will expand to show the folders that are saved within it. If the folder contains a subfolder, you can expand that as well using the same method. The image to the right shows the C:\ drive and the English Folder expanded. You can see in the folder list that the English folder contains two subfolders -- "Journals" and "Papers". If you wanted to see what was in the Papers folder, you would click on it.
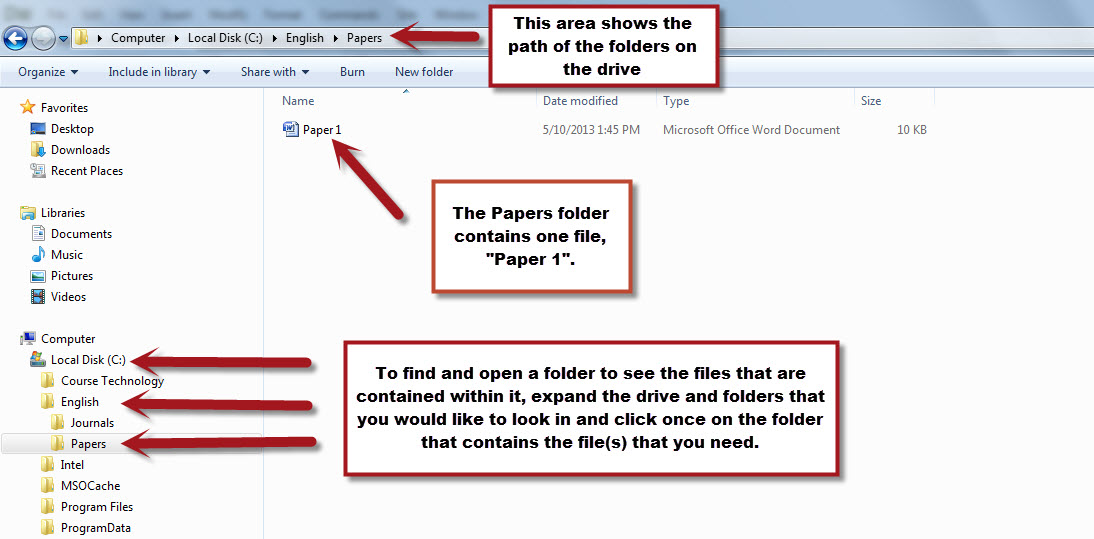
Doing this will change the right pane of the screen to display the contents of the folder. In this case, we have expanded the C:\ drive, the English folder and have clicked on the Papers folder to display the one file that is contained within it. In this example, the file is a Microsoft Word Document named "Paper 1". If you were to double click on the filename, the Microsoft Word program would launch on your computer (assuming that you have it installed) and the file would open.
The next document will show you specific strategies, how-to's and tips for working with your folders and files.

